Database > RDS for MySQL > DB Instance
DB Instance
DB instance is a concept that encompasses virtual equipment and installed MySQL, a unit of MySQL provided by RDS for MySQL. You do not have direct access to the operating system of the DB instance, but only to the database through the port you entered when you created the DB instance. The available port ranges have the following restrictions.
- The available port range is between 3306 and 43306.
The DB instance is identified by the customer-assigned name and the automatically assigned 32-byte ID. DB instance name has the following restrictions.
- DB instance name must be unique by region.
- DB instance name contains alphabets, numbers, and - _ between 1 and 100 characters. ,and the first character must be an alphabet.
Create DB Instance
You can create DB instance using the settings below.
Availability Zone
NHN Cloud has divided the entire system into several availability zones to prepare for failures caused by physical hardware problems. These availability zones are storage systems, network switches, top surfaces, and power supplies, which are all configured separately for each zone. Failure within one availability zone does not affect other availability zones, increasing the availability of the entire service. Deploying DB instances across multiple availability zones can further increase the service availability. Network communication is possible between DB instances that are scattered across multiple availability zones, and there is no network usage charge.
[Caution] You cannot change the availability zone of DB instance that you have already created.
DB Engine
The versions specified below are available.
| Version | Note |
|---|---|
| 8.0 | |
| MySQL 8.0.36 | |
| MySQL 8.0.35 | |
| MySQL 8.0.34 | |
| MySQL 8.0.33 | |
| MySQL 8.0.32 | |
| MySQL 8.0.28 | |
| MySQL 8.0.23 | |
| MySQL 8.0.18 | |
| 5.7 | |
| MySQL 5.7.37 | |
| MySQL 5.7.33 | You cannot restore a DB instance from an external backup. |
| MySQL 5.7.26 | |
| MySQL 5.7.19 | |
| MySQL 5.7.15 | |
| 5.6 | |
| MySQL 5.6.33 | A new DB instance cannot be created. Only supports creating and restoring read replicas of existing DB instances. |
For the DB engine, version upgrades are possible through the modification feature of web console after creation. Details about DB engine can be found in DB Engine.
DB Instance Type
DB instances have different CPU cores and memory capacity depending on the type. When creating DB instance, you must select appropriate DB instance type according to database workload.
| Type | Description |
|---|---|
| m2 | Instance type that balances CPU and memory. |
| c2 | Instance type with high CPU performance. |
| r2 | Available when memory is busy compared to other resources. |
| x1 | Instance type that supports higher-end CPU and memory. Recommended for services or applications that require high performance. |
The type of DB instance that you have already created can be easily changed through the web console.
[Caution] If you change the type of DB instance that you have already created, the DB instance will be terminated, resulting in a few minutes of downtime.
Data Storage
It stores the database's data files on data storage. DB instances support two types of data storage HDD and SSD. Performance and price vary depending on the type of data storage, so you need to choose the right type depending on the database workload. Data storage can be created from 20GB to 2TB.
[Caution] You cannot change the data storage type for DB instance that you have already created.
[Note] To use more than 2TB of data storage, contact NHN Cloud Customer Center.
Because the following tasks use the I/O capacity of data storage, the performance of DB instance may be degraded during the process.
- Back up single DB instance
- Configuring High Availability for single DB Instance
- Create read replications
- Rebuild Read Replication
- Rebuild Candidate Master
- Restore to a certain point in time
- Export backup to the object storage
High Availability
High availability DB instances increase availability, data durability, and provide fault tolerant databases. High availability DB instances consist of master and candidate master and are created in different availability zones. Candidate master is a DB instance for failover and is not normally available. For high availability DB instances, backups are performed on candidate master, which avoids performance degradation caused by backups. Several features provided by a high availability DB instance can be found in High Availability DB Instance.
Network
When create DB instance, you have to select the VPC subnet to connect to. You can communicate without a separate floating IP between instances of Compute service connected to the same subnet and you will not be charged for network traffic. DB instances block all network access by default, so you must apply DB security groups if you want to connect.
[Caution] You cannot change the subnet of DB instance that you have already created.
Floating IP
To access DB instance from the outside, you must connect the floating IP to DB instance. You can create a floating IP only if you connect the subnet to which the Internet Gateway is connected. Floating IP is charged upon use, and separately, if traffic is directed to the Internet through floating IP, it is charged separately.
Parameter group
A parameter group is a set of parameters that allow you to set up a database installed on DB instance. You have to select one parameter group when creating a DB instance. You can change parameter groups freely after creating. Refer to Parameter Group for a detailed description of parameter groups.
DB Security Group
DB security groups are used to restrict access in case of external intrusion. You can allow access to specific port ranges or database ports for incoming and outgoing traffic. You can apply multiple DB security groups to DB instance. For more details on DB security groups, see the DB security groups.
Backup
You can set up periodic backups of the databases in your DB instance, or you can create backups at any time through the web console. Performance may degrade during backups. To avoid affecting service, it is better to perform back up at a time when the service is under low load. If you do not want the backup to degrade performance, you can use a high-availability configuration or perform backups from read replica. Backup files are stored on internal object storage and are charged based on the size of backup storage. You can export to user object storage in NHN Cloud if necessary. To prepare for unexpected failures, we recommend that you set up backups to conduct periodically. For more details on backup, see Backup and Restore.
Default Notification
When you create a DB instance, you can set default notifications. If setting default notifications, it will create a new notification group with the name {DB instance name}-default and will automatically set the notification items below. You can freely modify and delete alert groups that are created as default notification. For more details on notification group, see the notification group .
| Item | Comparison Method | Threshold value | Duration |
|---|---|---|---|
| CPU Usage | >= | 80% | 5 minutes |
| Storage Remaining Usage | <= | 5,120MB | 5 minutes |
| Database Connection Status | <= | 0 | 0 minute |
| Storage usage | >= | 95% | 5 minutes |
| Data Storage Defects | <= | 0 | 0 minute |
| Connection Ratio | >= | 85% | 5 minutes |
| Memory Usage | >= | 90% | 5 minutes |
| Slow Query | >= | 60 counts/min | 5 minutes |
Deletion Protection
If you activate deletion protection, you can protect DB instances from accidental deletion.
DB instances
You can view DB instances created from the web console. It can be viewed as groups of DB instances or as individual DB instances.

❶ You can change DB instance screen mode.
❷ By clicking on the button, you can open or close a DB instance that belongs to a group.
❸ It displays the most recently collected monitoring indicators.
❹ You can view the current status.
❺ A spinner will appear if have any work in progress.
❻ You can change the search criteria.
The status of the DB instance consists of the following values and changes depending on the behavior of the user and the current status.
| Failed Training : Indicates the number of failed lessons. | Description |
|---|---|
| BEFORE_CREATE | Before Create |
| AVAILABLE | Available |
| STORAGE_FULL | Insufficient capacity |
| FAIL_TO_CREATE | Failed to create |
| FAIL_TO_CONNECT | Linking failed |
| REPLICATION_STOP | Replication stopped |
| FAILOVER | Failover complete |
| FAILOVER_SHUTDOWN | Failover completed (shutdown), failed over DB instance before April 11, 2023 |
| SHUTDOWN | Stopped |
Search conditions that can be changed are as follows.
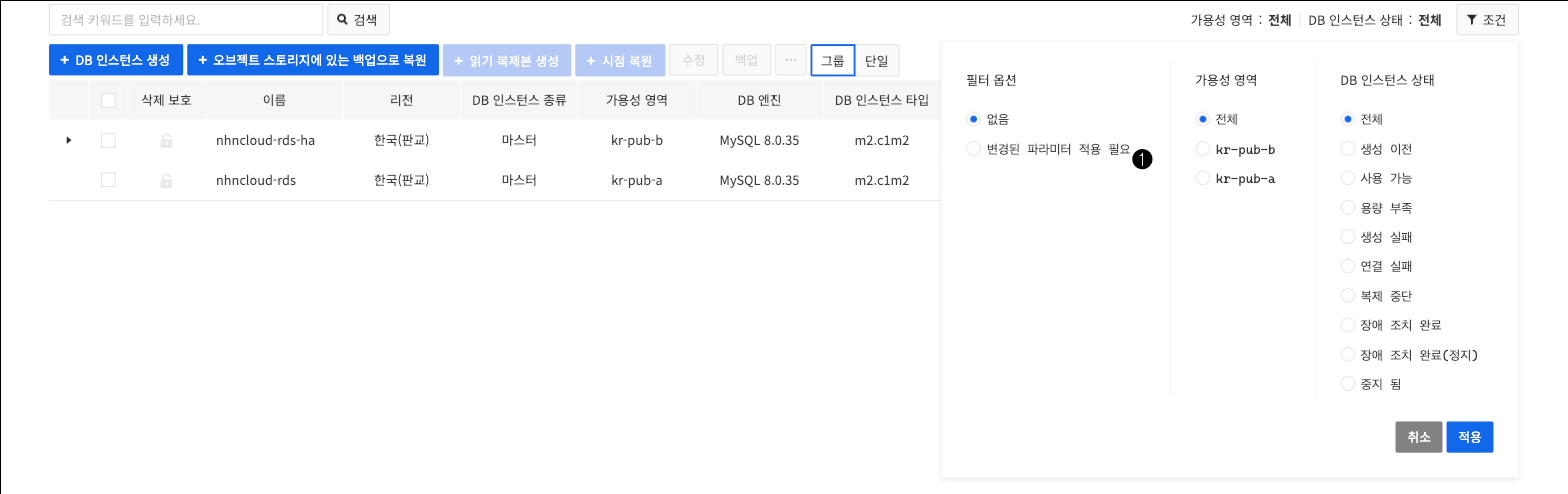
❶ You can search for DB instances with filtering conditions that require parameter changes to be applied.
DB Instance Details
You can select a DB instance to view the details.
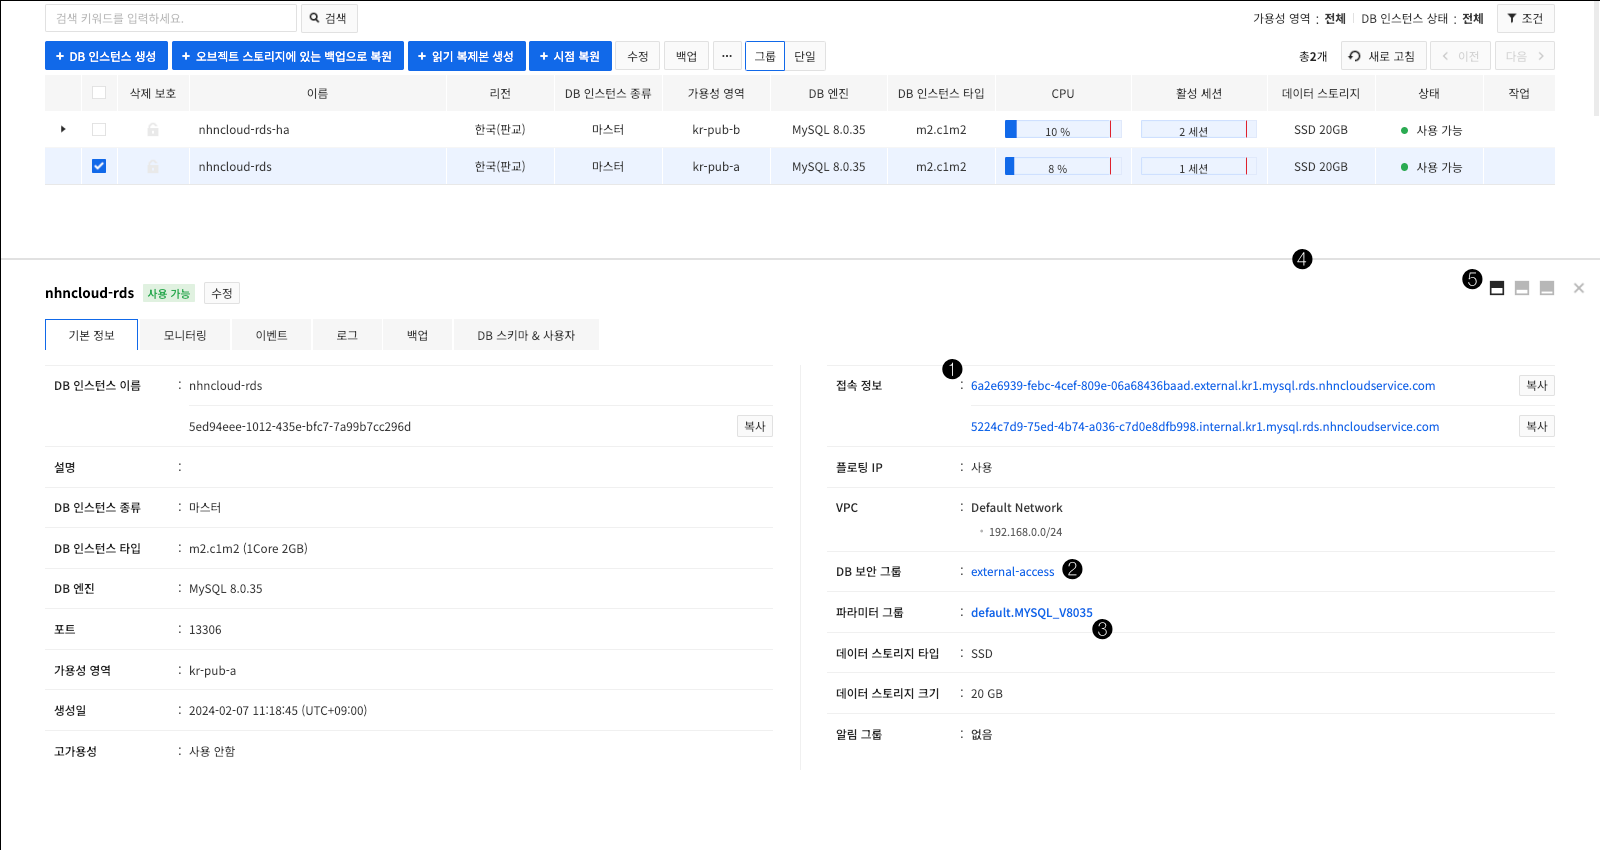
❶ When you click on the domain of the connection information, a pop-up window appears to confirm the IP address. ❷ When you click on DB Security Group, a pop-up window appears where you can check DB security rules. ❸ Click on a parameter group to go to a screen where you can see the parameters. ❹ Drag and drop the screen to adjust the height of the Details information panel. ❺ You can adjust the height of the Details information panel to a pre-determined height.
Access Information
When you create a DB instance, it issues an internal domain. The internal domain refers to the IP address that belongs to the user's VPC subnet. For high-availability DB instances, the internal domain does not change even if the candidate master is changed to a new master due to failover. Therefore, unless there is a special reason, applications must use the internal domain for access information.
If you created a floating IP, issue additional external domains. The external domain points to the address of the floating IP. Because external domains or floating IPs are accessible from outside, you must protect the DB instance by setting the rules of DB security group appropriately.
Log
You can view and download various log files from Log tab of DB instance. Log files are rotated to the settings set as below. Some log files can be enabled or disabled in the parameter group.
| Item | Rotate settings | Whether or not to change | Related parameter |
|---|---|---|---|
| error.log | 10 of 100MB | fixed | |
| slow_query.log | 40 of 100MB | fixed | slow_query_log |
| general_log.log | 40 of 100MB | fixed | general_log |
| server_audit.log | 30 of 20MB | Changeable | server_audit_loggingserver_audit_file_rotations |
| mysql-bin.xxxxxx | 5 days | Changeable | binlog_expire_logs_seconds (8.X version)expire_logs_days (5.X version) |
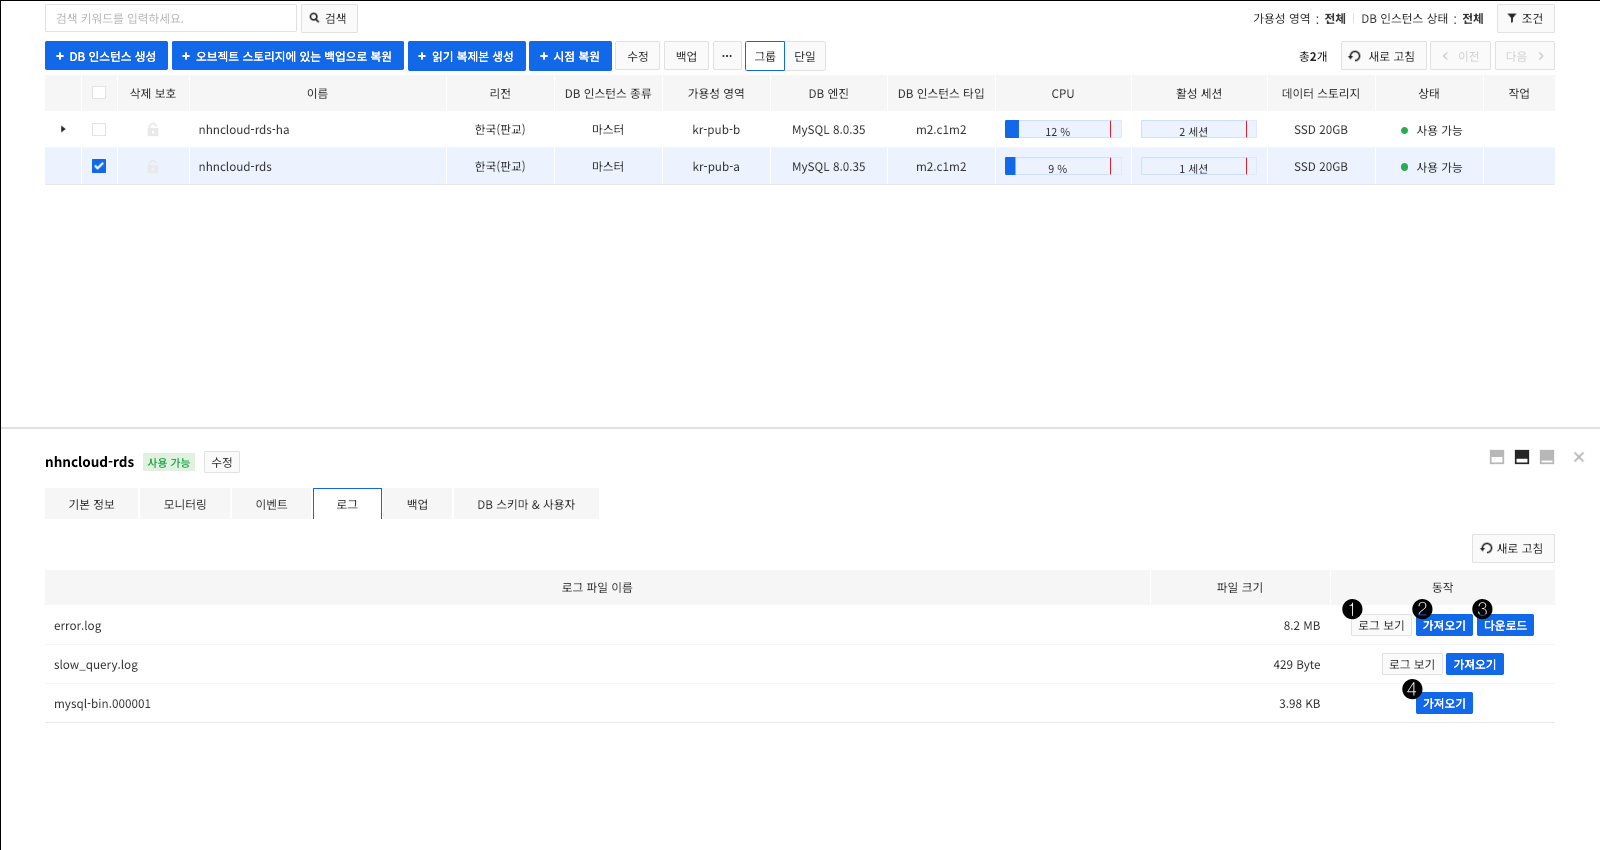
❶ Click on View Logs and you will see a pop-up window where you can check the contents of the log file. You can check logs up to 65,535 Bytes. ❷ When Import is clicked, the request is made to download the log file for DB instance. ❸ When download is ready, Download button will be exposed. Click to download the log.
[Caution] When Import is clicked, the log file is uploaded to backup storage for approximately 5 minutes and the backup storage capacity will be charged to the size of the log file. Click on Download to charge Internet traffic as the size of the log file.
❹ For binary logs, you can download them in two forms. Click on Import and you will see a pop-up window where you can select the type of binary log.
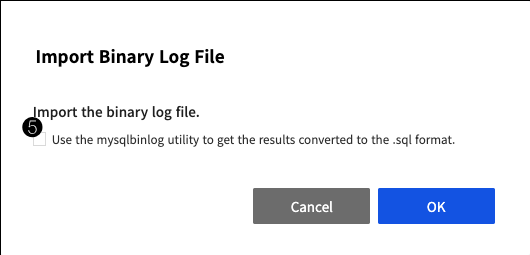
❺ Select to use the mysqlbinlog utility to convert the binary log into SQL file and then download it.
DB Schema and Users
DB instance's DB Schema and User tab allows you to query and control the schema and users created in the database.
DB schema created
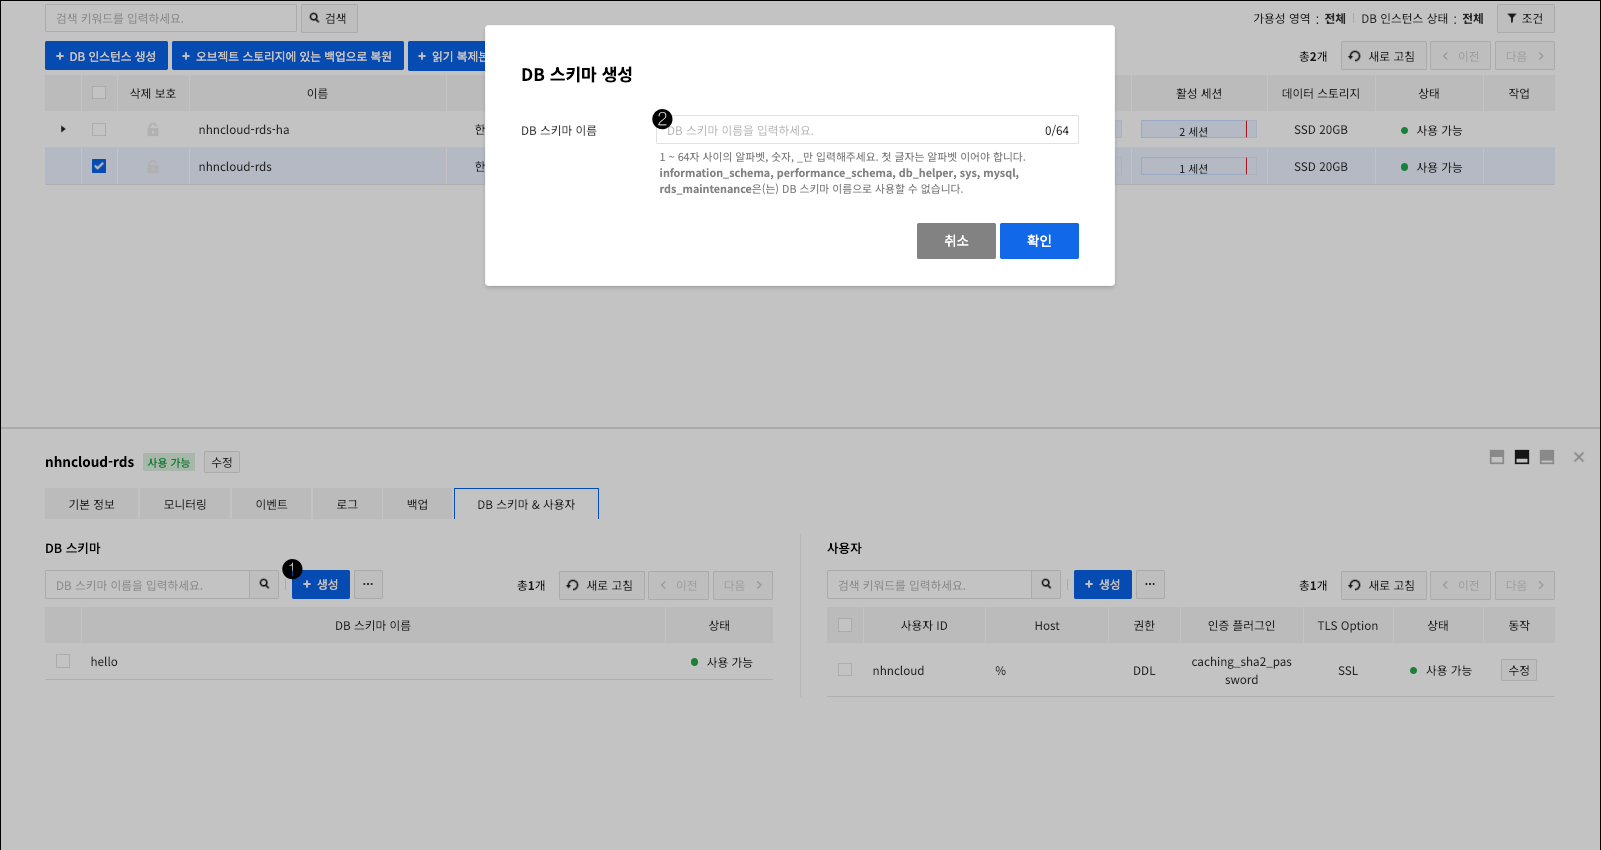
❶ Click on Create and a pop-up window will appear where you can enter the name of DB schema. ❷ You can create a DB schema by entering the DB schema name and clicking on Confirm.
DB schema name has the following restrictions.
- You can only use alphabets, numbers, and _ from 1 to 64 characters and the first letter can only contain alphabetic characters.
information_schema,performance_schema,db_helper,sys,mysql,rds_maintenanceare not allowed to be used as DB schema name.
You cannot modify the name of DB schema that has created.
DB schema deleted
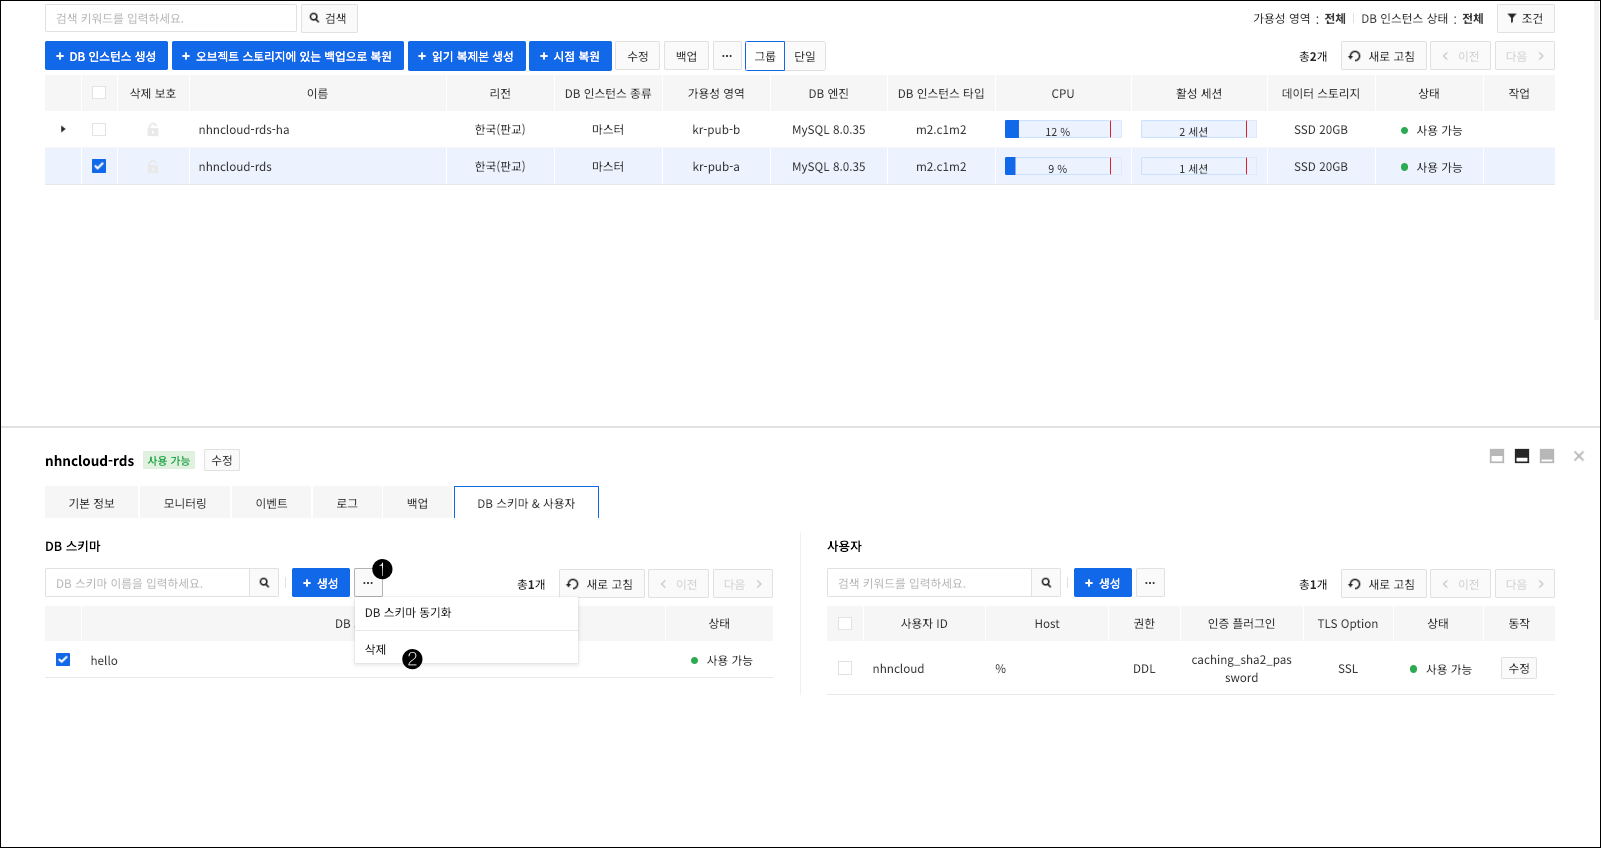
❶ Select DB schema you want to delete and click on the drop-down menu. ❷ Click on Delete menu and pop-up window will appear to confirm deletion. You can request to delete by clicking on Confirm.
Create a user
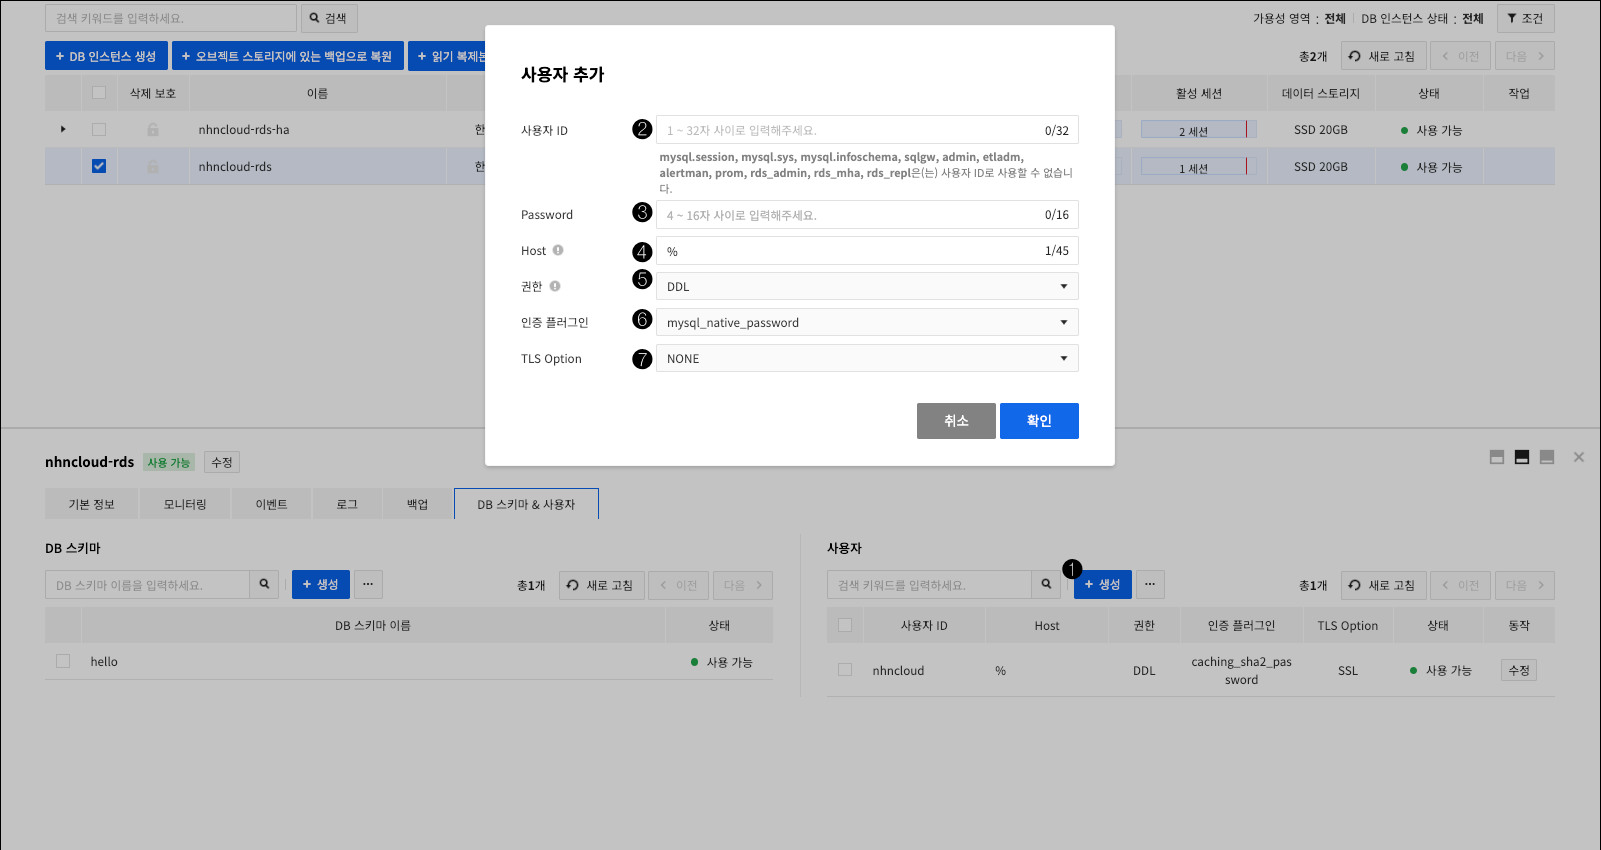
❶ Click on +Create and you'll see the Add User pop-up window. ❷ Enter a user ID.
User ID has the following restrictions.
- It must be between 1 and 32 characters.
mysql.session,mysql.sys,mysql.infoschema,sqlgw,admin,etladm,alertman,prom,rds_admin,rds_mha,rds_replare not allowed to be used as User ID.
❸ Enter a password.
❹ Enter a Host IP to allow connection. Using % character lets you range the Host IPs you want to allow. For example, 1.1.1.1% means all IPs between 1.1.0 and 1.1.1.255.
❺ Select the permissions that you want to grant to users. The permissions and descriptions that you can grant are as follows.
READ * You have permission to view.
GRANT SELECT, SHOW VIEW, PROCESS, SHOW DATABASES, REPLICATION SLAVE, REPLICATION CLIENT ON *.* TO '{user_id}'@'{host}';
GRANT SELECT ON `mysql`.* TO '{user_id}'@'{host}';
GRANT SELECT, EXECUTE ON `sys`.* TO '{user_id}'@'{host}';
GRANT SELECT ON `performance_schema`.* TO '{user_id}'@'{host}';
CRUD * Includes READ permission, and has permission to modify data.
GRANT INSERT, UPDATE, DELETE, CREATE TEMPORARY TABLES, LOCK TABLES, EXECUTE ON *.* TO '{user_id}'@'{host}';
DDL * Includes CRUD permissions, and has permissions to execute DDL queries.
GRANT CREATE, DROP, INDEX, ALTER, CREATE VIEW, REFERENCES, EVENT, ALTER ROUTINE, CREATE ROUTINE, TRIGGER, RELOAD ON *.* TO '{user_id}'@'{host}';
GRANT EXECUTE ON `mysql`.* TO '{user_id}'@'{host}';
CUSTOM * When restoring a DB instance from an external database backup, all users that exist in the database are represented with the CUSTOM permission. * You cannot check what permissions are in the CUSTOM permission template. * If you change from one CUSTOM permission template to another permission template, you cannot change back to a CUSTOM permission template.
❻ Select the plug-in to apply to user authentication. The following plug-ins are available for each version.
| Authentication Plugin | Supported Versions |
|---|---|
| mysql_native_password | All versions |
| sha256_password | 5.7.33 version or later and below 8.0 version |
| caching_sha2_password | 8.0 version or later |
❼ Select the connection encryption option for DB instances.
| TLS Option | Description |
|---|---|
| NONE | Encrypted connections are not applied. |
| SSL | Encrypted connections are applied. |
| X509 | An encrypted connection is applied and a certificate is required for access. The certificate required for access can be downloaded from the web console. |
[Note] User authentication plug-ins and TLS options are supported in MySQL 5.7.33 and later versions.
Download Authentication Certificate
If you set TLS option for your account to X509, you need a certificate to access the DB instance.
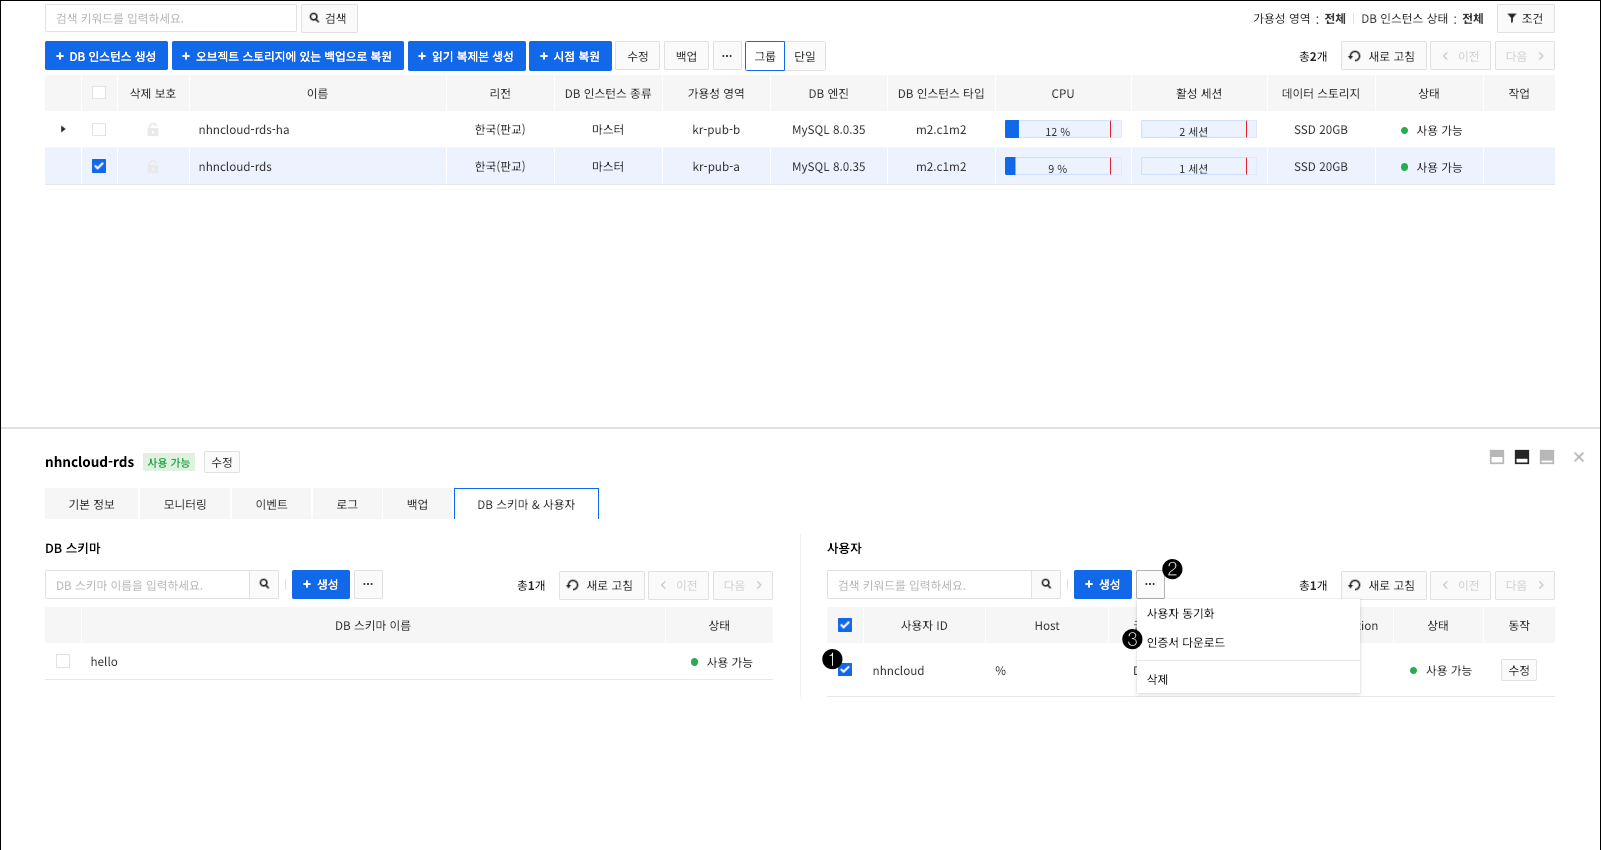
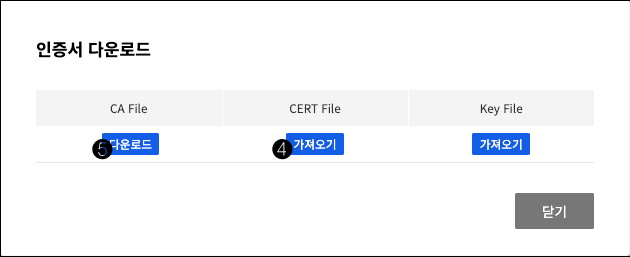
❶ Select the DB instance to which you want to download the certificate. ❷ Click on drop-down menu. ❸ Click on Download Certificate and you will see a pop-up window where you can download the certificate. ❹ Click on Import at the bottom of the file you want to download. ❺ When you are ready to download, the Download button appears. Click to download the certificate file.
[Caution] When Import is clicked, the certificate file will be uploaded to backup storage for approximately 5 minutes, and the backup storage capacity will be charged to the size of the certificate file. Click onDownload to charge Internet traffic as much as the size of the certificate file.
Edit users
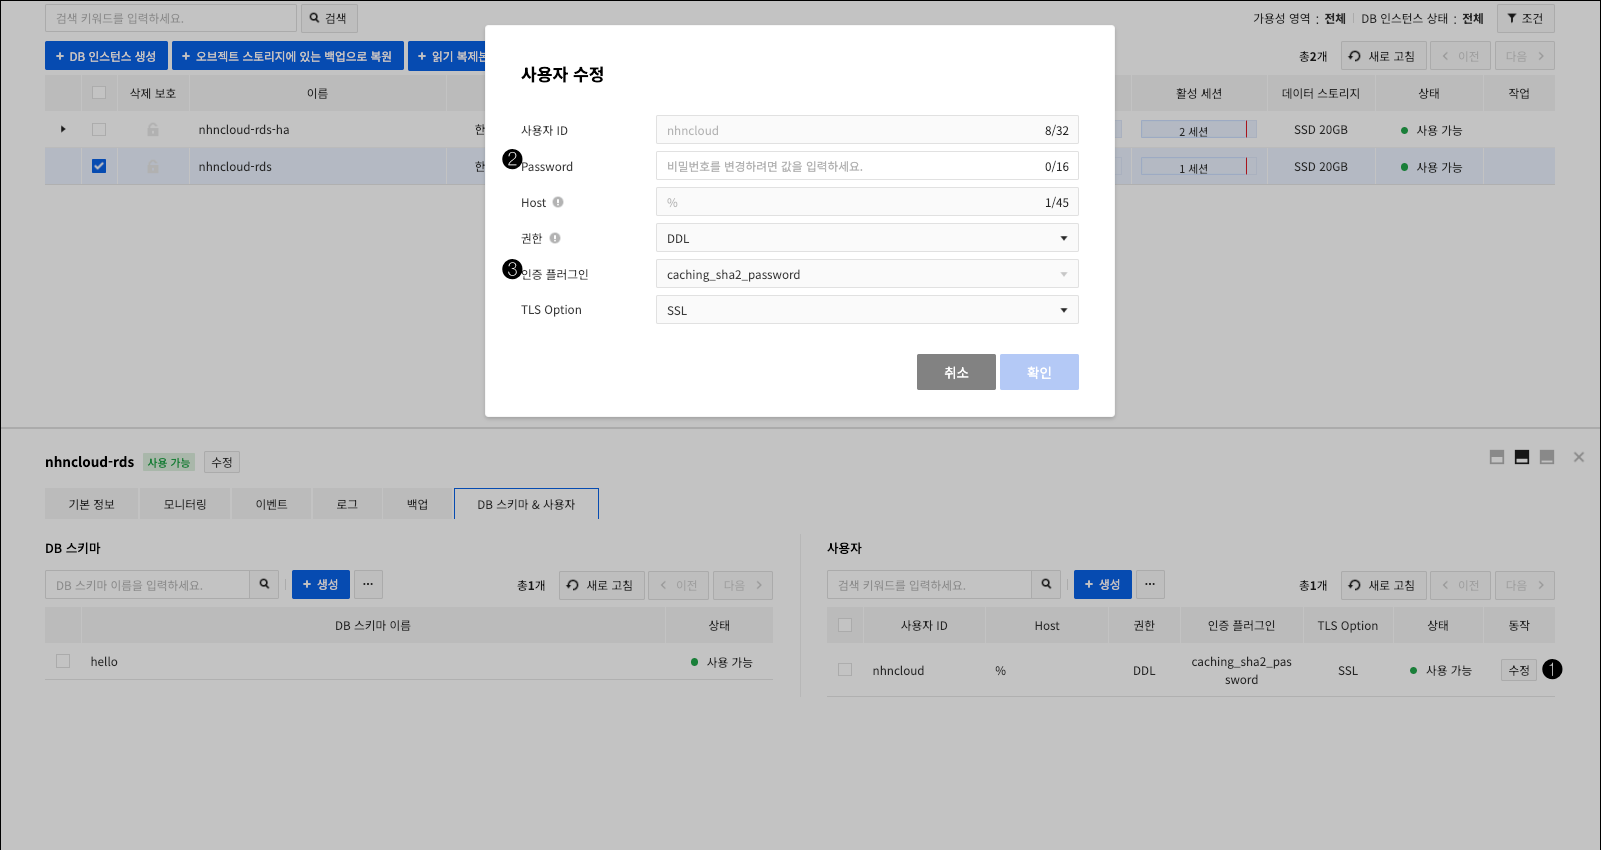
❶ Click on Modify on the user row you want to modify and you will see a pop-up window where you can modify your information. ❷ If you do not enter Password, it will not be changed. ❸ If you want to change the plug-in that applies to user authentication, you must change the password.
Deleting a user
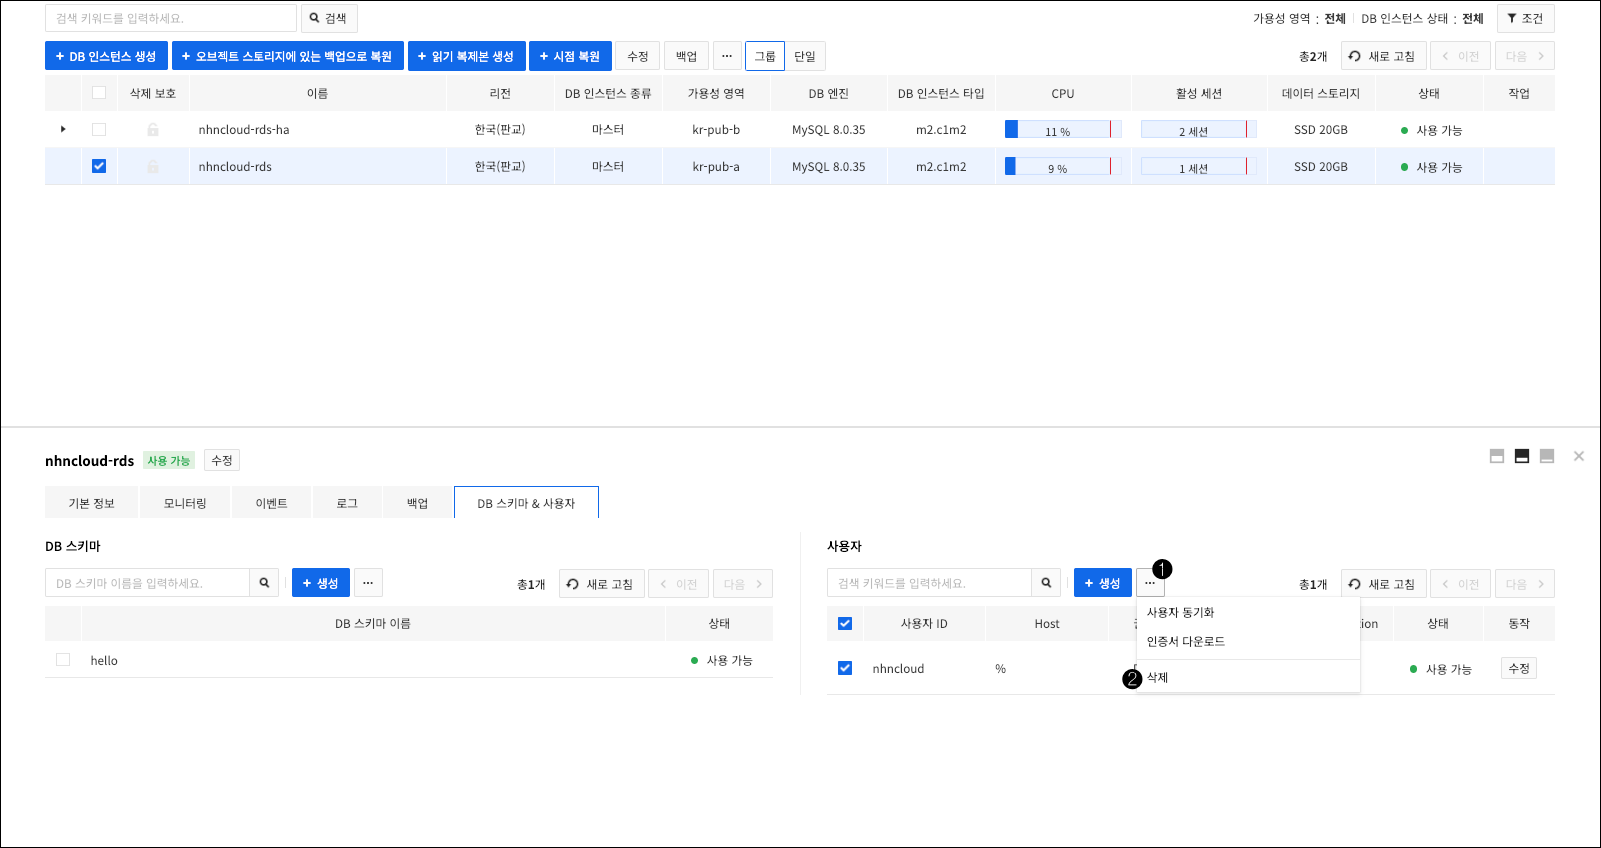
❶ Select the user you want to delete and click on the drop-down menu. ❷ Click on Delete and Confirm Delete pop-up window will appear. You can request deletion by clicking on Confirm.
Modify DB instance
You can easily change various items in DB instances created through web console. Changes requested are applied to DB instances sequentially. If restarting is required during the application process, apply all changes and restart DB instance. The following are the items that cannot be changed and require restarting.
| Item | Whether or not you can change | Whether or not you need to restart |
|---|---|---|
| Availability Zone | No | |
| DB Engine | Yes | Yes |
| DB Instance Type | Yes | Yes |
| Data Storage Type | No | |
| Data Storage Size | Yes | Yes |
| Whether high availability or not | Yes | No |
| PING interval | Yes | No |
| Name | Yes | No |
| Description | Yes | No |
| DB port | Yes | Yes |
| VPC Subnet | No | |
| Floating IP | Yes | No |
| Parameter group | Yes | Determined by whether or not to restart changed parameters |
| DB Security Group | Yes | No |
| Backup Settings | Yes | No |
| Schema & User Control | Yes | No |
For high availability DB instances, if there are any changes to items that need to be restarted, it provides a restart capability using failover to increase stability and reduce disconnected time.
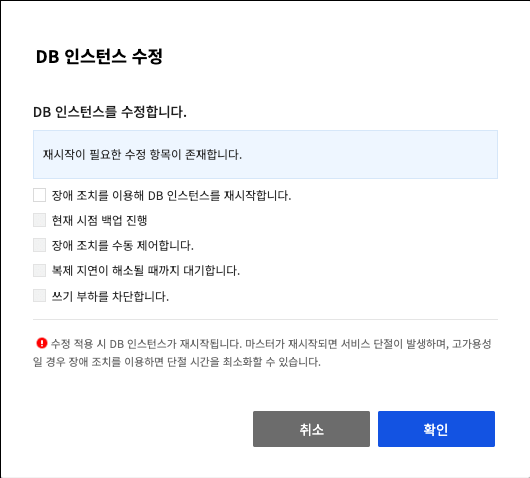
If restart with failover is not enabled, the DB instance is restarted after the changes are sequentially applied to the master and candidate master. For more information, refer to Manual failover item in a high availability DB instance.
DB Schema & Direct User Control
RDS for MySQL provides management from the web console to make it easier to manage DB schemas and users, but it also provides the feature to set up so that users can control themselves. Direct control grants all currently created users the following privileges.
GRANT CREATE,DROP,LOCK TABLES,REFERENCES,EVENT,ALTER,INDEX,INSERT,SELECT,UPDATE,DELETE,CREATE VIEW,SHOW VIEW,CREATE ROUTINE,ALTER ROUTINE,EXECUTE,CREATE USER,PROCESS,RELOAD,REPLICATION SLAVE,REPLICATION CLIENT,SHOW DATABASES, CREATE TEMPORARY TABLES,TRIGGER ON *.* TO '{user_id}'@'{host}' WITH GRANT OPTION;
[Caution] If you change it to Disabled again after using direct control * Already granted permissions are not revoked. If you use the command to add DB schema or users at this time, the data in the web console may not match. * All users that exist in the database, regardless of the permissions granted to them, are represented by CUSTOM permissions.
Upgrade DB instance operating system
Supports DB instance operating system upgrades. By upgrading the operating system, you can resolve security vulnerabilities or respond to the end of life (EOL) of the operating system. Caution is required when upgrading the operating system because it may result in service disruption. Highly available DB instances can minimize service disruption through failover.
You can check the operating system information of the current DB instance on the DB instance details screen.
❶ You can check the operating system information of the DB instance. ❷ If the operating system is eligible for version upgrade, the OS Version Upgrade button appears.
Operating system version upgrades behave differently depending on whether you are in a highly available configuration or not. For high availability, the operating system version upgrade is performed using failover. For non-high availability, the operating system version upgrade is performed by restarting the DB instance.
When you click the OS Version Upgrade button for a single DB instance, the following pop-up screen appears.
When you click the Upgrade Operating System Version for High Availability DB Instance button, the pop-up screen shown below appears. For more information, see Manual Failover of High Availability DB Instances.
Delete DB Instance
You can delete DB instances that are no longer in use. If you delete a master, you will also delete both the candidate master and read replicas that belong to that replication group. Because deleted DB instances cannot be recovered, we recommend that you enable the Delete Protection settings for important DB instances.
Backup
You can prepare in advance to recover the database of your DB instance in case of failure. You can perform backups from the web console whenever necessary or you can set up periodic backups. Refer to Backup for more information.
Restoration
You can use backups to restore data to any point in time. Restore always creates a new DB instance and cannot be restored to existing DB instance. Refer to Restore for more information.
Secure Capacity
If the capacity of the data storage is insufficient due to the excessive generation of binary logs from rapid load, you can delete the binary logs using Secure Capacity feature in web console. When you select Secure Capacity in web console, you will see a pop-up window where you can select the binary logs for DB instance. Select the binary log and press Confirm to delete all binary logs created prior to the selected item. The Secure Capacity is a feature that temporarily secures capacity. If you keep running out of capacity, you must set the storage period for the binary log or expand the size of the data storage to match your service load.
[Note] You can set the storage period for binary logs with the
expire_logs_daysin MySQL 5.7 and later and thebinlog_expire_logs_secondsparameter in MySQL 5.8 and later.[Note] You can set the storage period for binary logs with the expire_logs_days in MySQL 5.7 and later and the binlog_expire_logs_seconds parameter in MySQL 5.8 and later.
Apply parameter group changes
Even if the settings for a parameter group associated with DB instance change, these changes do not apply automatically to DB instance. If the settings for the parameter applied to DB instance and the parameters group associated are different, the Web console displays parameter button.
You can apply changes in a parameter group to DB instance by using one of the following methods.
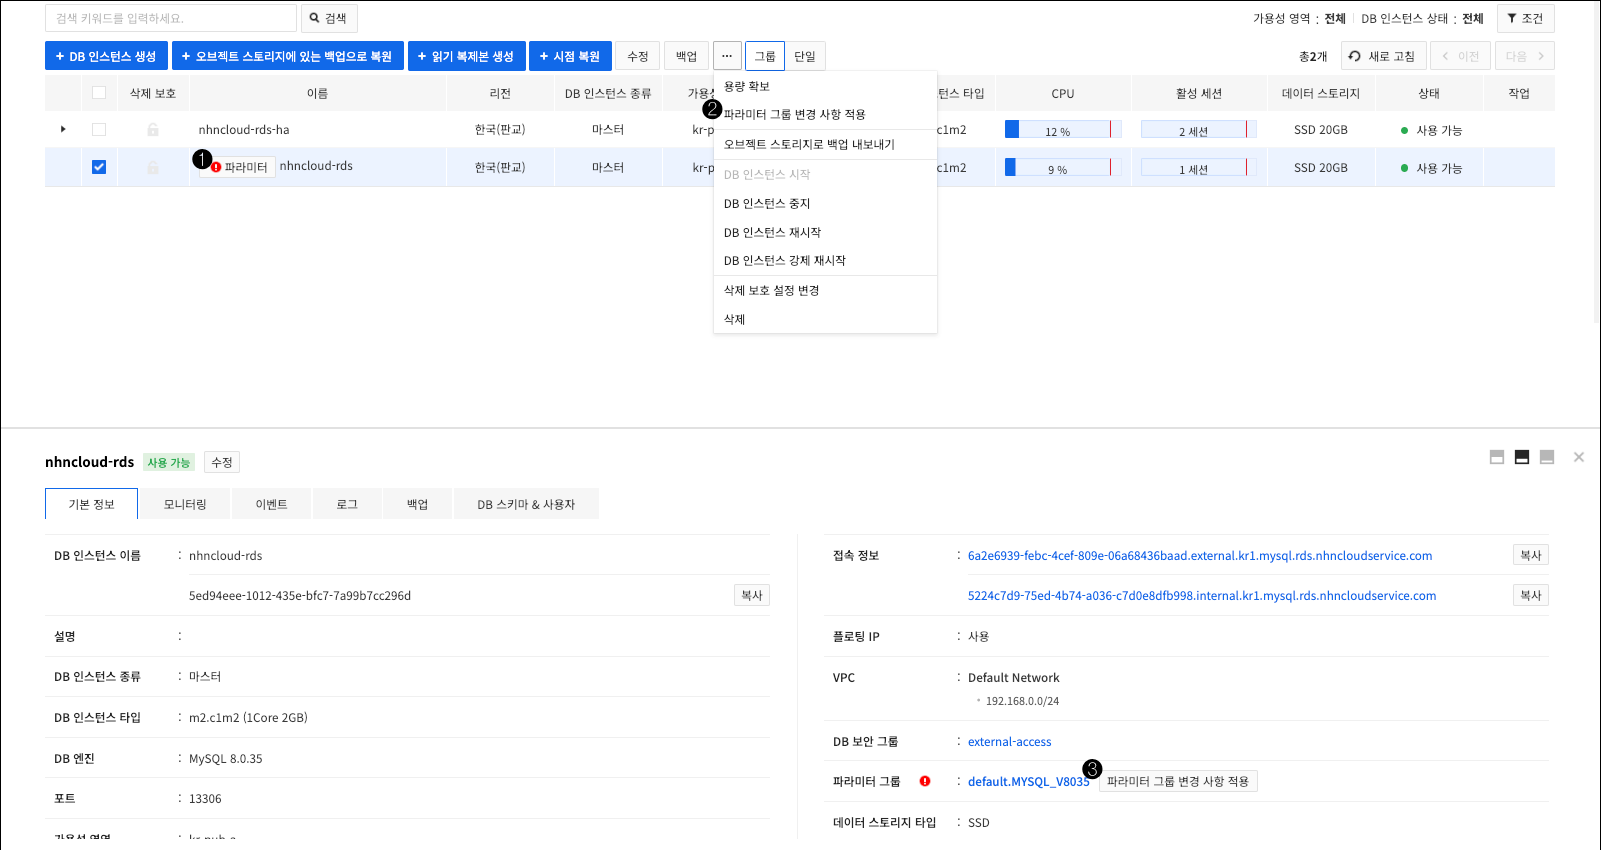
❶ Click on Parameters of the DB instance or ❷ Select the DB instance and click on Apply Parameter Group Changes from the drop-down menu, or click ❸ On Basic Information tab of the target DB instance, click on Apply Parameter Group Changes.
If the parameters in the parameter group that require restart are changed, the DB instance is restarted during the process of applying the changes.
High availability DB instances provide restart feature using failover to increase stability and reduce disconnected time.
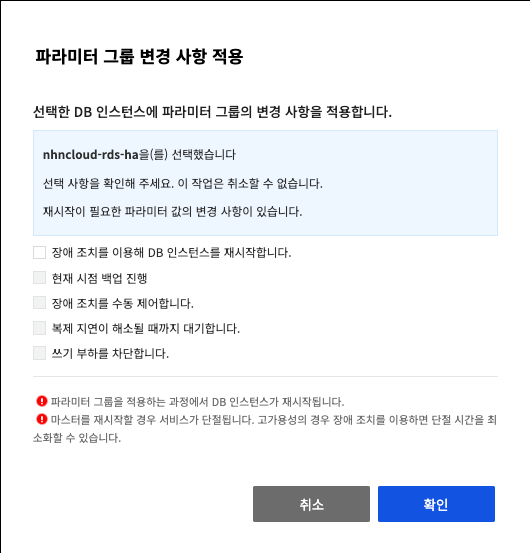
If restart with failover is not enabled, the DB instance is restarted after the changes are sequentially applied to the master and candidate master. For more information, refer to Manual failover item in a high availability DB instance.
Recover from backup in object storage
You can upload an external MySQL backup file to user object storage in NHN Cloud to restore it to DB instance in RDS for MySQL. For more information, refer to Restore with External MySQL Backup.
Export backup to the object storage
You can export backup files to user object storage in NHN Cloud at the same time as you perform a backup. Refer to Export Backup for more information.
Read Replica
To improve read performance, you can create read -replicas that can be used for read-only. You can create up to 5 read replicas per master. You cannot create read replicas of read replicas.
Create read replications
To create read replicas, you need backup files and binary logs created with the Enable table lock option among DB instances in the replication group. If you do not have a backup file, use the following steps to select DB instance for which you want to back up.
❶ Read replica with auto backup enabled ❷ Candidate master with auto backup enabled ❸ Master with auto backup enabled
If there is no DB instance that meets the criteria, the request to create a read replica will fail.
[Caution] The read replica creation time may increase in proportion to the database size of the master. For DB instances that are backed up, there may be a drop in storage I/O performance during the read replica creation process.
[Note] Backup storage charges can be as much as the size of a binary log required for the read replica creation process.
To create a read replica from the web console,

❶ Select the source DB instance and click on Create Read Replica
You can create a read replica using the settings below.
Unchangeable items
When you create a read replica, you cannot change the items listed below because they follow the settings of source DB instance.
- DB Engine
- Data Storage Type
- User VPC Sub-nets
Read Replica Region
If you support region peering when you select a region to create a read replica, you can create a read replica on a sub-net belonging to a different region VPC by connecting region peering between VPCs that exist in different regions. However, selecting a region that is different from the region of the original DB instance might cause replication delays and does not support DB version upgrades.
[Caution] If the route settings are incorrect, even if the region peering is connected, the creation of a read replica might fail or the replication might be interrupted.
Availability Zone
Select the availability zone for read replica. Refer to Availability Zone for a detailed description.
DB Instance Type
It is recommended that read replicas be created to the same specification or higher than the master; creating them to a lower specification can cause replication delays.
Data Storage Size
It is recommended to make it the same size as the source DB instance. If you set a smaller size, the replication process may be interrupted due to insufficient data storage capacity.
Floating IP
Select whether or not to use floating IP for read replicas. Refer to Floating IP for a detailed description.
Parameter group
If you do not need to change replication-related settings when selecting a parameter group for a read replica, we recommend that you select the same parameter group as the original DB instance. Refer to Parameter Group for a detailed description of the parameter groups.
DB Security Group
Select the DB security group that you want to apply to read replicas. Because the rules required for replication are applied automatically, you do not need to add replication-related rules to DB security group separately. Refer to DB security group for a detailed description of the DB security group.
Backup
Select backup settings for the read replica. Refer to Backup and Restore for a detailed description of backup.
Default notification
Select whether or not to enable default notifications, refer to default notifications for a detailed description.
Deletion Protection
Select whether or not to enable deletion protection. Refer to Deletion Protection for a detailed description.
Promote read replication
The process of breaking the replication relationship with the master and converting a read replica to an independent master is called promotion. The promoted master will act as an independent DB instance. If there is a replication delay between the read replica and the master that you want to promote, the promotion will not take place until the delay is resolved. Once promoted, a DB instance cannot be reverted to the previous replication relationship.
[Caution] If the master DB instance is in an abnormal state, you cannot proceed with the promotion operations.
[Note] You can perform promotion operations from the same region's web console as the region where the read replica is located.
Force Promotion of Read Replicas
Force promotion is processed based on current point-in-time data of the read replica, regardless of the state of the master or original region. Reproduction delays can result in data loss. Therefore, we do not recommend using this feature unless you are in a situation where you urgently need to put the read replica into service.
Stop Replication of Read Replicas
Read replicas can be stopped for several reasons. If the status of the read replica is Replication stopped, you must quickly determine the cause and perform normalization. If the Replication stopped status persists for a long time, the replication delay will increase. If you do not have the binary log required for normalization, you must rebuild the read replica. The reason for replication stop can be determined by the SHOW SLAVE STATUS command in the read replica. If the value
of Last_Errno is 1062, you can call the Procedure below until the error disappears.
mysql> CALL mysql.tcrds_repl_skip_repl_error();
Rebuild Read Replica
If you can't resolve the replication issue of read replica, you can restore it to its normal state by rebuilding. This process deletes all databases in the read replica and rebuilds it anew based on the master database. During rebuilding, read replicas are unavailable to use. Rebuilding read replicas requires backup files and binary logs created with the Enable Table Lock option among DB instances in the replication group. If you don't have a backup file, refer to Create Read Replica for actions and precautions.
[Note] Connection information (domain, IP) does not change after rebuilding
Restart DB instance
You can restart a DB instance when you restart MySQL or want to manually do failover a high availability DB instance. We recommend that you perform it during low service load times to minimize restart times. For high availability DB instances, if restarting with failover is not enabled, restart the candidate master first, then restart the master. For restarting with failover feature, refer to Manual Failover item.
To restart a DB instance from the web console

❶ Select the DB instance you want to restart and click on Restart DB instance menu from the drop-down menu.
DB instance force restart
If MySQL in the DB instance is not working properly, you can force a restart. For forced restart, issue a SIGTERM command in MySQL and wait 10 minutes for it to shut down normally. If MySQL shuts down normally within 10 minutes, reboot the virtual machine afterward. If it does not shut down normally within 10 minutes, force a reboot of the virtual machine. If the virtual machine is forced to reboot, some of the transactions you are working on might be lost and the data volume might be corrupted, making recovery impossible. After a forced restart, the state of the DB instance might not return to the available state. Contact Customer Center if this situation occurs.
[Caution] Because there is a possibility of data loss or data volume corruption, this feature should not be used except in urgent and unavoidable circumstances.
[Note] For high availability DB instances, you cannot force restart.
To force restart a DB instance, from the web console

❶ Select the DB instance for which you want a forced restart and from the drop-down menu, click on Force Restart DB instance menu.
Change Deletion Protection Settings
Enabling Delete Protection protects DB instances from being accidentally deleted. You cannot delete DB instances until Delete Protection is disabled. To change Delete Protection settings

❶ If you select the DB instance for which you want to change the Deletion Protection settings and click on Change Deletion Protection Settings menu from the drop-down menu, a pop-up window will appear.

❷ Change the Delete Protection settings and click on Confirm.
High Availability DB Instances
High availability DB instances increase availability, data durability, and provide fault tolerant databases. High availability DB instances consist of master and candidate master and are created in different availability zones. Candidate master is a DB instance for failover and is not normally available. For high availability DB instances, backups are performed on the sample master.
[Note] For high availability DB instances, if you set to use MySQL query statement to force replication from another DB instance or from a master in external MySQL, high availability and some features do not work properly.
Failure Detection
Candidate master has a process for detecting failures, which periodically detects the state of the master. This detection period is called ping interval and takes failover if four consecutive health checks fail. The shorter the ping interval, the more sensitive to the fault respond is, and the longer the ping interval, the less insensitive the fault respond is. It is important to set the appropriate ping interval for the service load accordingly.
[Note] When the master's storage usage is full, the high availability monitoring process detects it as a failure and takes action, which you should be taken note of.
Automatic Failover
When the candidate master fails the master's health check four times in a row, it determines that the master is unable to provide service and automatically performs a failover. In order to prevent split brains, disconnect all user security groups assigned to the failed master to block external connections, and the preliminary master will take over the role of the master. A record in the internal domain for access are changed from the failed master to the preliminary master, so no changes to the application are required. When failover is completed, the type of failed over master changes to the failed over master and the type of candidate master changes to the master. No failover is performed until the failed over master is recovered or rebuilt. Promoted master takes over all automatic backups of the failover master. Point-in-time restoration using existing backups is not supported because the master changes during failover and all binary logs are deleted. You can restore point-in-time from the time the new backup was performed on the promoted master.
[Note] As the high availability feature is based on a domain, if a client trying to connect is in a network environment where the DNS server cannot be reached, the DB instance cannot be accessed through the domain, and normal connection is not possible in the event of failover. It takes approximately 3 seconds for the changes to A record in the internal domain to take effect, but may vary depending on the DNS Cache policy in the client environment where attempting to connect.
[Caution] If the position number value of the binary log between master and candidate master differs by more than 100,000,000, there is no failover.
Failed over Master
A master that fails and conducts failover is called failover master. Backups of failed over master are not automatically performed, and all other features other than failed over master recovery, rebuild, separate, and delete are not performed.
Recover Failed Over Master
If the data is not consistent during failover and the binary log is not lost from the point of failure to the point of attempting recovery, the failed over and promoted masters can be recovered back to the high availability configuration. Because it re-configure replication relationships with the promoted master in the database of the failed over master, recovery fails once the data became inconsistent or once the binary log required for recovery was lost.
If the failed over master fails to recover, you can re-enable the high availability feature by rebuilding.
[Note] Recovery is not supported for DB instances where failover occurred before April 11, 2023.
To recover a failover master, from the web console
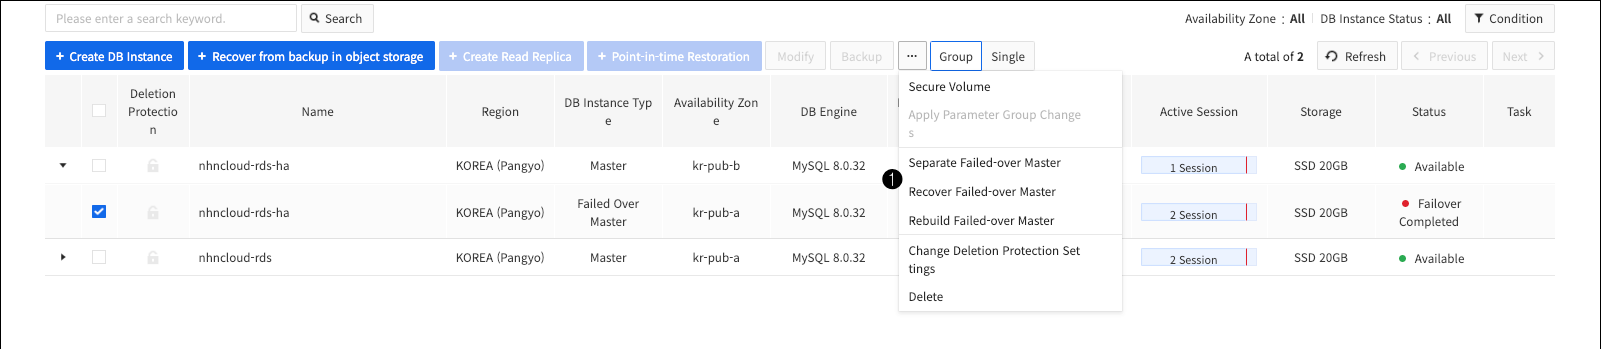
❶ Select the failover master you want to recover from and click on Recover
Failed Over Master menu from the drop-down menu.
Rebuild Failed over Master
If the failed over master fails to recover, you can re-enable the high availability feature by rebuilding. Unlike recovery, rebuild removes all databases from the failed over master and rebuilds them based on the promoted master's database. In this process, if you do not have a backup file, use the following order to select the DB instance to perform backup.
❶ Read Replica with auto backup enabled ❷ Master with auto backup enabled
If there is no DB instance that meets the condition, the failover master rebuild request fails.
[Caution] In proportion to the size of the master's database, the time to rebuild the failover master can be increased. For DB instances where backups are performed, storage I/O performance may be degraded during the failover master rebuilding.
[Note] Backup storage charges can be as much as the size of the binary log required for the failover master rebuild process.
To rebuild a failover master, from the web console

❶ Select the failover master you want to rebuild and click on Rebuild failover master menu from the drop-down menu.
Separate Failed over Master
If recovery of a failed over master fails and data correction is required, you can disable the high availability feature by separating that master. The replication relationship between the separated master and the promoted master is broken, and each behaves as a normal DB instance. After separation, you cannot recover to the existing configuration.
To separate failover master, from the web console

❶ Select the failed master you want to isolate and click on Separate failed over master menu from the drop-down menu.
Manual Failover
For a high availability DB instance, you can select whether or not to restart with a failover when you perform an operation that accompanies a restart, which is as follows.
- Restart DB instance
- Changes items that need to be restarted
- Apply changes to parameters that require restart
- DB Instances migration for Hypervisor Check
After a restart using failover, the backup master will be restarted first. After that, the backup master will be promoted to the master through failover, and the existing master will act as the candidate master. Upon promotion, the A record in the internal domain for the connection will be changed from master to candidate master, so no application changes are required. The promoted master succeeds to all automatic backups of the old master. Point-in-time restoration with existing backups is not supported because the master changes during the failover and all binary logs are deleted. You can restore points-in-time from the time when the new backup is performed on the promoted master.
[Note] Because the high availability feature is domain-based, if the client attempting to connect is in a network environment where the DNS server cannot be accessed, the DB instance cannot be accessed through the domain, and successful connection is not possible in the event of a failover. It takes approximately 3 seconds to reflect changes in the A record in the internal domain. The time required may vary depending on the DNS Cache policy of the client environment attempting to connect.
[Caution] If the Seconds_Behind_Master value of the read replica included in the replication group with the candidate master is greater than or equal to 1, replication delay is considered to have occurred and a manual failover will fail. It is recommended that you perform manual failover during off-peak hours. Restart failures due to replication delays can be verified through the Events screen.
When restarting with a failover, you can select the following additional items to increase stability.
Progress current point-in-time backup
Because all binary logs are deleted during the failover process, you can proceed with manual backups immediately after the failover is complete.
Manual Control of Failover
You can apply changes to the candidate master first and then observe the trend, or you can control when you want to perform a failover at the exact time from the web console. When you select Failover Manual Control, the ❶ web console displays the Failover button after the candidate master restarts. Click on this button to activate the failover, which can wait up to 5 days for the failover to occur. If the failover is not enabled within five days, the task will be automatically cancelled.

[Caution] While waiting for a failover, no automatic failover occurs.
Waiting for Resolve Replication Delay
When you enable Resolve Replication Delays option, you can wait for replication delays for the candidate master and read replicas in the Replication group to disappear.
Block usage load
You can select to further block the usage load while resolving replication delays. Blocking the usage load puts the master in read-only mode and sets all change queries to fail immediately before performing the failover.
High availability suspended
High availability features can be temporarily stopped in situations where a temporary operation can cause a connection outage or heavy load. When a high availability feature is suspended, it does not detect a failure and does not perform a failover action. When a high availability feature is suspended, performing an operation that requires a restart does not restart the suspended high availability feature. It is not recommended to leave data replication in a pause state for an extended period of time because high availability feature is paused and data replication is successful or failure is not detected.
Rebuild Candidate Master
Candidate master replication can be disrupted due to a variety of reasons, such as network disconnection, incorrect FEDERATED engine use, and replication settings from other masters. Candidate masters in a Stopped Replication state do not perform automatic failover. To resolve a backup master's Stopped Replication, the candidate master needs to be rebuilt. When rebuilding a candidate master, it removes all of the candidate master's databases and rebuilds them based on the master's database. In this process, if the backup file required for rebuilding does not exist in the master database, the backup is performed on the master, which can cause performance degradation.
MySQL Procedure
RDS for MySQL provides its own procedures for performing some of the features that are restricted from user accounts to provide user convenience.
tcrds_active_process
- Make inquiry of Process list for ACTIVE status, not Sleep status.
- Data output is displayed in order of longest performance time to shortest, and the query value (SQL) is displayed up to hundred digits.
mysql> CALL mysql.tcrds_active_process();
tcrds_process_kill
- Forces to end a specific process.
- Process ID to end can be checked in information_schema.processlist, and the process information can be checked using the tcrds_active_process and tcrds_current_lock procedures.
mysql> CALL mysql.tcrds_process_kill(processlist_id );
tcrds_current_lock
- Check the processes currently waiting for a lock and the process information occupying the lock.
- (w) Process information that column information waits to obtain locks
- (w) Process information that column information waits to obtain locks
- To force shutdown a process that occupies a lock, check the (B)PROCESS column and perform call tcrds_process_kill(process_id).
mysql> CALL mysql.tcrds_current_lock();
tcrds_repl_changemaster
- Used to import external MySQL DBs into NHN Cloud RDS using replication.
- Replication configuration of NHN Cloud RDS is done with Create replication of the console.
mysql> CALL mysql. tcrds_repl_changemaster (master_instance_ip, master_instance_port, user_id_for_replication, password_for_replication_user, MASTER_LOG_FILE, MASTER_LOG_POS);
- Explaining parameter
- master_instance_ip : IP of replication target (Master) server
- master_instance_port: MySQL port on the replication target (Master) server
- user_id_for_replication: an account for replication to access MySQL on the replication target (Master) server
- password_for_replication_user : Password of account for replication
- MASTER_LOG_FILE : Binary log file name of replication target (Master)
- MASTER_LOG_POS : Binary log file position of replication target (Master)
ex) call mysql.tcrds_repl_changemaster('10.162.1.1',10000,'db_repl','password','mysql-bin.000001',4);
[Caution] The account for replication must be created in MySQL of the replication target (Master).
tcrds_repl_init
- Reset MySQL replication information.
mysql> CALL mysql.tcrds_repl_init();
tcrds_repl_slave_stop
- Stop MySQL replication.
mysql> CALL mysql.tcrds_repl_slave_stop();
tcrds_repl_slave_start
- Start MySQL replication.
mysql> CALL mysql.tcrds_repl_slave_start();
tcrds_repl_skip_repl_error
- Run SQL_SLAVE_SKIP_COUNTER=1. When the following duplicate key error happens, run tcrds_repl_skip_repl_error procedure to resolve the replication error.
MySQL error code 1062: 'Duplicate entry ? for key ?'
mysql> CALL mysql.tcrds_repl_skip_repl_error();
tcrds_repl_next_changemaster
- Changes replication information to read the next binary log of master.
- When the following replication errors happens, run tcrds_repl_next_changemaster procedure to resolve the replication errors.
e.g. MySQL error code 1236 (ER_MASTER_FATAL_ERROR_READING_BINLOG): Got fatal error from master when reading data from binary log
mysql> CALL mysql.tcrds_repl_next_changemaster();
tcrds_innodb_monitor_reset
- A procedure that runs innodb_monitor_reset variables that reset the counter in Information_schema.INNODB_METRICS table to zero.
SET GLOBAL innodb_monitor_reset = '{counter-name|module_name|pattern|all}';Run the query.- innodb_monitor_enable, innodb_monitor_disable provides RDS parameter.
mysql> CALL mysql.tcrds_innodb_monitor_reset('{counter-name|module_name|pattern|all}');
ex) CALL mysql.tcrds_innodb_monitor_reset('dml_reads');
CALL mysql.tcrds_innodb_monitor_reset('module_dml');
tcrds_innodb_monitor_reset_all
- A procedure to run innodb_monitor_reset_all variables to reset counter value.
- To use innodb_monitor_reset_all, the counter should be in disable state.
SET GLOBAL innodb_monitor_reset_all = '{counter-name|module_name|pattern|all}';Run the query.
mysql> CALL mysql.tcrds_innodb_monitor_reset_all('{counter-name|module_name|pattern|all}');
Data Migration
- RDS can be exported as data to or imported from NHN Cloud RDS using mysqldump.
- The mysqldump utility is provided by default when mysql is installed.
Export using mysqldump
- Prepare and use an instance of NHN Cloud RDS.
- Check that the external instance on which you want to store the data to be exported, or the computer on which the local client is installed, has sufficient capacity.
- If you need to export data outside of NHN Cloud, create Floating IP and connect it to the RDS instance where you want to export the data.
- Export data externally using the mysqldump command below.
When exporting files
mysqldump -h{rds_instance_floating_ip} -u{db_id} -p{db_password} --port={db_port} --single-transaction --routines --events --triggers --databases {database_name1, database_name2, ...} > {local_path_and_file_name}
Exporting in mysql db out of NHN Cloud RDS
mysqldump -h{rds_instance_floating_ip} -u{db_id} -p{db_password} --port={db_port} --single-transaction --routines --events --triggers --databases {database_name1, database_name2, ...} | mysql -h{external_db_host} -u{external_db_id} -p{external_db_password} --port={external_db_port}
Import by using mysqldump
- Prepare db outside NHN Cloud RDS to import data.
- Check that the NHN Cloud RDS instance that you import has sufficient capacity.
- Create a Floating IP to connect to the NHN Cloud RDS instance.
- Import data from outside using the mysqldump command below.
mysqldump -h{external_db_host} -u{external_db_id} -p{external_db_password} --port={external_db_port} --single-transaction --set-gtid-purged=off --routines --events --triggers --databases {database_name1, database_name2, ...} | mysql -h{rds_insance_floating_ip} -u{db_id} -p{db_password} --port={db_port}
When ERROR 1227 occurs during data importing
ERROR 1227occurs when a stored object (trigger, view, function, or event) in the mysqldump file has DEFINER definition.- To resolve this, delete the
DEFINERpart of the mysqldump file and proceed.
When ERROR 1418 occurs during data importing
ERROR 1418occurs when the function declaration in the mysqldump file does not contain NO SQL, READS SQL DATA, or DETERMINISTIC and binary logging is enabled.- For detailed information, refer to The Binary Log MySQL document.
- To resolve this, Parameter value of
log_bin_trust_function_creatorsof DB instance to which you want to apply mysqldump file should be changed to1.
Export by using replication
- Replication allows you export data from NHN Cloud RDS to external DB.
- The external db version has to be the same as or later than the version of NHN Cloud RDS.
- Prepare an instance of NHN Cloud RDS Master or Read Only Slave to export data.
- Create Floating IP to connect to NHN Cloud RDS instances to export data.
- Create Floating IP to connect to NHN Cloud RDS instances to export data.
- When exporting from Master RDS instance.
mysqldump -h{rds_master_instance_floating_ip} -u{db_id} -p{db_password} --port={db_port} --single-transaction --master-data=2 --routines --events --triggers --databases {database_name1, database_name2, ...} > {local_path_and_file_name}
- When exporting from Read Only Slave RDS.
mysqldump -h{rds_read_only_slave_instance_floating_ip} -u{db_id} -p{db_password} --port={db_port} --single-transaction --dump-slave=2 --routines --events --triggers --databases {database_name1, database_name2, ...} > {local_path_and_file_name}
- Open the backed up file and record the MASTER_LOG_FILE and MASTER_LOG_POS written in the annotation separately.
- Check that the external local client or computer on which db is installed has sufficient capacity to back up data from the NHN Cloud RDS instance.
- Add the following options to my.cnf (for winodws my.ini) file in external DB.
- For server-id, enter a value different from the server-id of the DB Configuration entry for the NHN Cloud RDS instance.
...
[mysqld]
...
server-id={server_id}
replicate-ignore-db=rds_maintenance
...
- Restart external DB.
- Enter the backed up file into an external DB using the command below.
mysql -h{external_db_host} -u{external_db_id} -p{external_db_password} --port={external_db_port} < {local_path_and_file_name}
- Create an account for replication on the NHN Cloud RDS instance.
- Before setting up a new replication, run the query below to initialize existing replication information that may exist. When you run RESET SLAVE, the existing replication information is initialized.
STOP SLAVE;

RESET SLAVE;
- Run the query on the external DB as shown below, using the account information to be used for replication and the MASTER_LOG_FILE and MSATER_LOG_POS that recorded earlier.
CHANGE MASTER TO master_host = '{rds_master_instance_floating_ip}', master_user='{user_id_for_replication}', master_password='{password_forreplication_user}', master_port ={rds_master_instance_port}, master_log_file ='{MASTER_LOG_FILE}', master_log_pos = {MASTER_LOG_POS};

START SLAVE;
- If the source data of the external DB and the NHN Cloud RDS instance are identical, use the STOP SLAVE command to the external DB to terminate the replication
Import with Replication
- You can import external DBs into NHN Cloud RDS using replication.
- NHN Cloud RDS version has to be the same as or later than the external DB version.
- Connect the data to an external MySQL instance to which it is exported.
- Use the command below to back up data from an external MySQL instance.
- To import data from external MySQL instance (master)
mysqldump -h{master_instance_floating_ip} -u{db_id} -p{db_password} --port={db_port} --single-transaction --master-data=2 --routines --events --triggers --databases {database_name1, database_name2, ...} > {local_path_and_file_name}
- To import data from external MySQL instance (slave)
mysqldump -h{slave_instance_floating_ip} -u{db_id} -p{db_password} --port={db_port} --single-transaction --dump-slave=2 --routines --events --triggers --databases {database_name1, database_name2, ...} > {local_path_and_file_name}
- Open the backup file to record MASTER_LOG_FILE and MASTER_LOG_POS from the footnote.
- Verify that there is enough capacity on the client or computer to back up data from NHN Cloud RDS instance.
- Add below option to the my.cnf (or my.ini for Windows) file of the external database.
- Put a different value for Server ID, from the Server ID of DB Configuration of NHN Cloud RDS Instance.
...
[mysqld]
...
server-id={server_id}
replicate-ignore-db=rds_maintenance
...
- Restart external DB.
- As importing over an external network can take a long time,
- We recommend that you create an internal NHN Cloud Image, copy the backup file, and import it into NHN Cloud.
- Enter the backed up file into NHN Cloud RDS with the command below.
- Replication configuration does not support DNS, so convert to IP and run.
mysql -h{rds_master_instance_floating_ip} -u{db_id} -p{db_password} --port={db_port} < {local_path_and_file_name}
- Create an account for replication on an external MySQL instance.
mysql> CREATE USER 'user_id_for_replication'@'{external_db_host}' IDENTIFIED BY '<password_forreplication_user>';
mysql> GRANT REPLICATION CLIENT, REPLICATION SLAVE ON *.* TO 'user_id_for_replication'@'{external_db_host}';
- Run a query on NHN Cloud RDS as follows, using the account information to be used for replication and the MASTER_LOG_FILE and MSATER_LOG_POS that recorded earlier.
mysql> call mysql.tcrds_repl_changemaster ('rds_master_instance_floating_ip',rds_master_instance_port,'user_id_for_replication','password_forreplication_user','MASTER_LOG_FILE',MASTER_LOG_POS );
- To start replication, execute the following procedure.
mysql> call mysql.tcrds_repl_slave_start;
- When original data of NHN Cloud RDS instance become same as the external database, close replication by using the command as below.
mysql> call mysql.tcrds_repl_init();
Delete Registry Account
Appendix 1. DB Instance Migration Guide for Hypervisor Maintenance
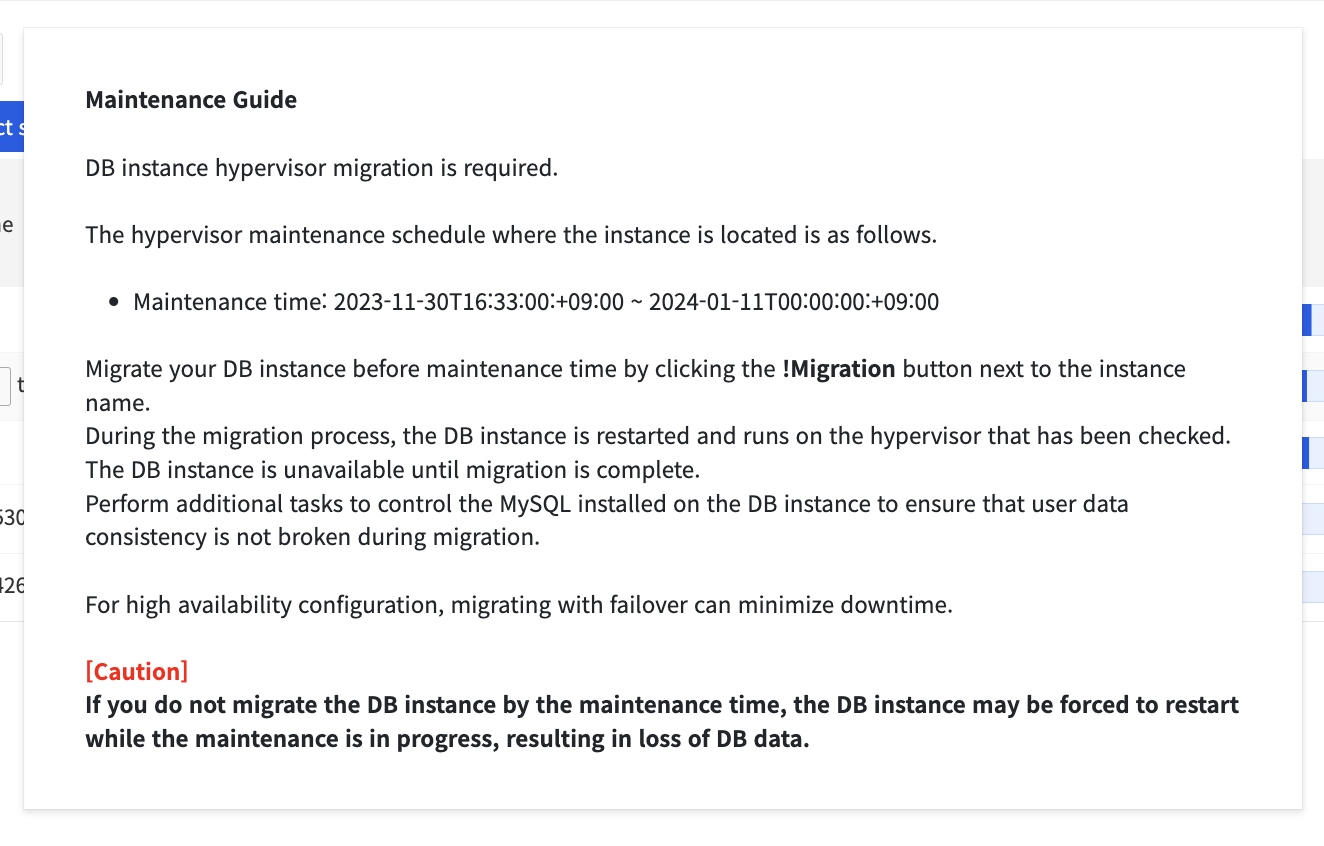
NHN Cloud periodically updates the hypervisor software of the DB instance to improve security and stability. DB instances running on a hypervisor that requires maintenance must be migrated to the hypervisor where maintenance has been completed.
You can start migrating DB instances from the NHN Cloud console. When you select a specific DB instance according to the DB configuration and migrate it, if the associated DB instance (for example, Slave instance) is also an inspection target, it proceeds with the migration together. Follow the guide below to use the migration feature on the console. Navigate to the project where the specified DB instance to be checked.
1. Check the DB instance that requires maintenance.
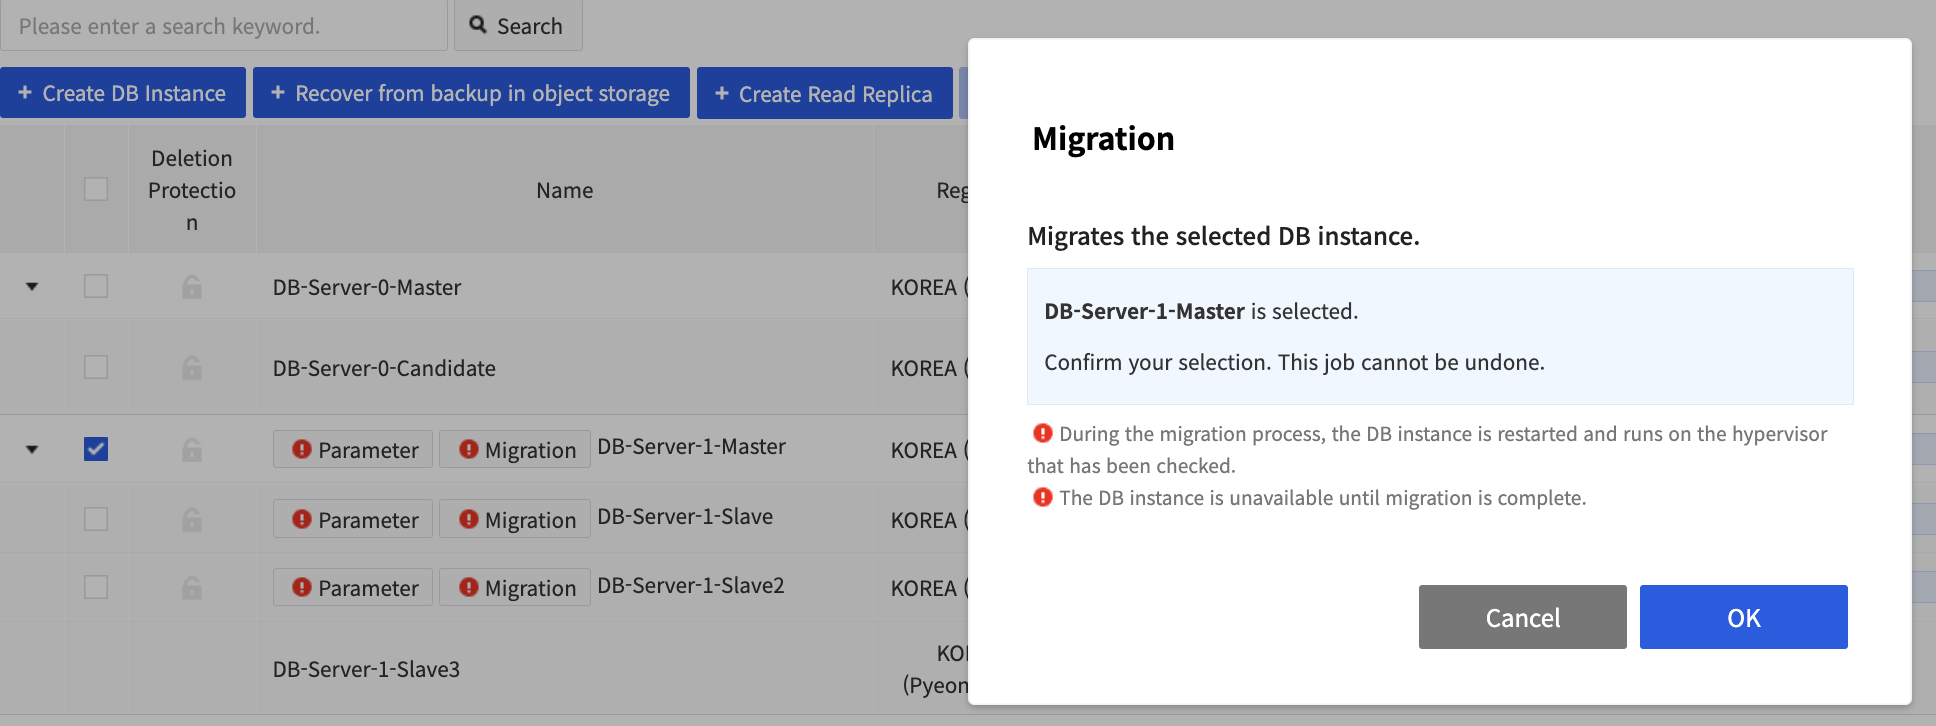
Those with the migration button next to name are the maintenance targets.
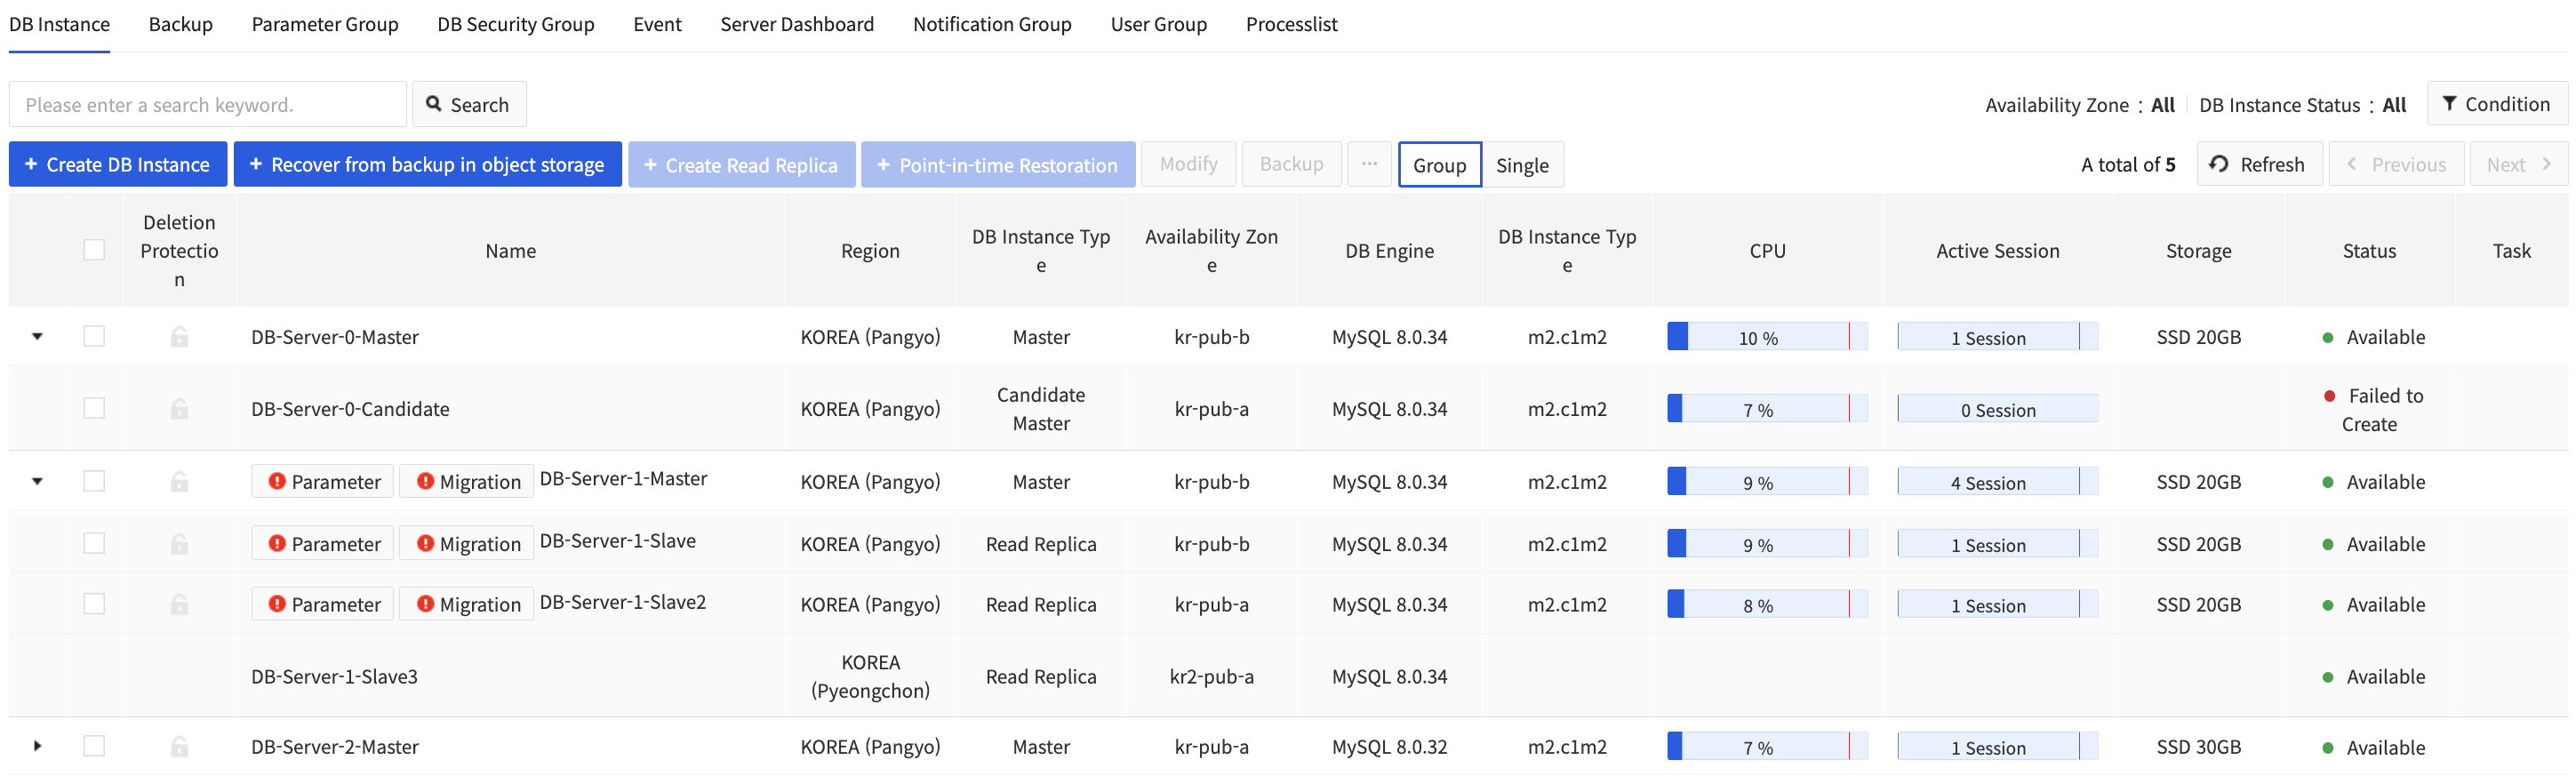
You can view the detailed inspection schedule by moving the mouse pointer over the migration button.
2. Make sure you close any application programs that are running on the DB instance.
Take appropriate measures to avoid affecting services connected to the DB. If it is inevitable to affect the service, please contact NHN Cloud Customer Center and we will guide you on appropriate measures.
3. Select a DB instance for maintenance, click migration, and click OK on window asking of migration.
4. Wait for the DB instance migration to finish.
If the DB instance state does not change, do 'refresh'.

No operations can be performed on the DB instance while migration is in progress. If the DB instance migration is not completed normally, it is automatically reported to the administrator, and NHN Cloud will contact you.
Appendix 2. Configuration guide for using Federated Storage Engine with RDS
When using Federated Storage Engine, make sure you consider the following.
For configuration using RDS as a local node
- Make sure you need to allow the outbound direction to remote nodes.
- You can add rules from DB security group.
- Refer to DB Security Group for more information.
- When using a configuration that adds Read Only Slave to RDS that serves as a local node, you need to specify a federated table in replicate-ignore-table of DB Configuration.
- When you configure Read Only Slave, the federated table is also replicated, allowing the Master and Read Only Slave to look at the remote node together.
- In this case, the data input performed on the Master is performed on the remote node according to the federated setting, and the same input is performed on the Read Only Slave, which may lead to stop replication due to duplicate key errors.
- Make sure you need to configure the settings of replicate-ignore-table so that Read Only Save does not replicate a federated table.
For configuration using RDS as a remote node
- Make sure you need to allow the inbound direction to local nodes.
- You can add rules from DB security group.
- Refer to DB Security Group for more information.
Table of Contents
- Database > RDS for MySQL > DB Instance
- DB Instance
- Create DB Instance
- Availability Zone
- DB Engine
- DB Instance Type
- Data Storage
- High Availability
- Network
- Floating IP
- Parameter group
- DB Security Group
- Backup
- Default Notification
- Deletion Protection
- DB instances
- DB Instance Details
- Access Information
- Log
- DB Schema and Users
- Modify DB instance
- DB Schema & Direct User Control
- Upgrade DB instance operating system
- Delete DB Instance
- Backup
- Restoration
- Secure Capacity
- Apply parameter group changes
- Recover from backup in object storage
- Export backup to the object storage
- Read Replica
- Create read replications
- Promote read replication
- Force Promotion of Read Replicas
- Stop Replication of Read Replicas
- Rebuild Read Replica
- Restart DB instance
- DB instance force restart
- Change Deletion Protection Settings
- High Availability DB Instances
- Failure Detection
- Automatic Failover
- Failed over Master
- Recover Failed Over Master
- Rebuild Failed over Master
- Separate Failed over Master
- Manual Failover
- High availability suspended
- Rebuild Candidate Master
- MySQL Procedure
- tcrds_active_process
- tcrds_process_kill
- tcrds_current_lock
- tcrds_repl_changemaster
- tcrds_repl_init
- tcrds_repl_slave_stop
- tcrds_repl_slave_start
- tcrds_repl_skip_repl_error
- tcrds_repl_next_changemaster
- tcrds_innodb_monitor_reset
- tcrds_innodb_monitor_reset_all
- Data Migration
- Export using mysqldump
- Import by using mysqldump
- Export by using replication
- Import with Replication
- Delete Registry Account
- Appendix 1. DB Instance Migration Guide for Hypervisor Maintenance
- Appendix 2. Configuration guide for using Federated Storage Engine with RDS